How to Use Shadowbox JS?
Internet hobbyist along with the advanced programmer created Shadowbox. They invent this app with a short time required for adding it’s default settings to your webpage. For those who are keen on customizing the features and other objects of the project, the plugin is pretty flexible and right what you need. Here you’ll find out the details of these both ways of installation, setting up and running the app.
Installation
First, install the code with right properties.
Second, unzip the downloaded folder from the archive, upload retrieved files into your server. Where to place it? It doesn’t matter. The plugin instantly finds the appropriate location. Just don’t split those documents.
The final stage is to link to either to JavaScript or to CSS. Follow the example below.
Setup
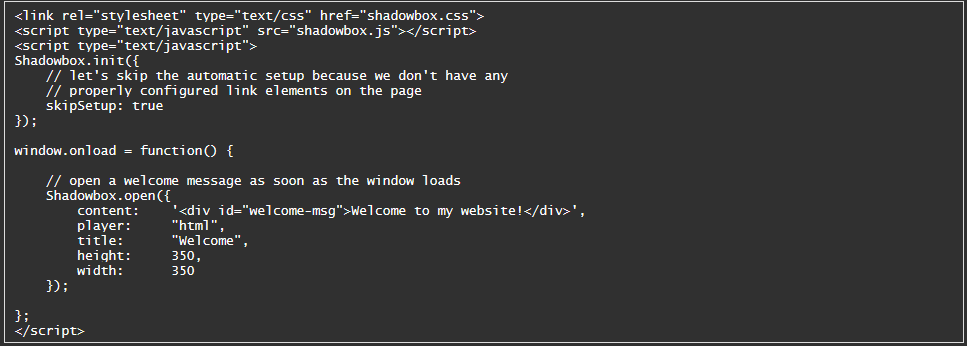
1) Add files JavaScript or CSS to your html or other documents (webpage’s code), right after <head> and put Shadowbox.init after:

Next option is a little bit more complicated. It includes special Shadowbox features. Writing the code this way, you’ll get the default parameters of your page’s content using Shadowbox.
HTML Markup
What’s that? It’s for identifying the links you want to be shown as Shadowbox. So, first can be adding the attribute rel=”shadowbox” to each particular link. Let’s say there is an image with this link:
![]()
Simply put the abovementioned attribute here:
![]()
Work is done! To check where the image is opened in the plugin, just click on it!
Remember: such word as lightbox is also applicable here. Originally Lightbox script has this feature. One obstacle is that tags of HTML area don’t work with rel attribute, this way you won’t be able to set up Shadowbox in the way described above. There is a separate way of Shadowbox.setup here.
title attribute can be also simply added to your link if needed.
![]()
If you want to add some parameters like content’s dimensions, you need precisely to show Shadowbox. Just add height and width parameters (in pixels), separated by semi-colons, to the rel attribute.
![]()
Along with showing the separate pictures, films, and other content, the plugin is also used for displaying the libraries (galleries). It’s very easy, adding the gallery title or name to rel attribute will assign a link.This name should be put exactly like in a picture below. In result, you’ll get the gallery of two images with name “Vacation”.
![]()
You can add various types of content to your gallery. Follow the code below and see some examples.

More specific options
Using HTML markup, you’ll reach the Shadowbox opportunities for your project much easily, rather than been controlled and manipulated by only JavaScript.
Markupsection has already shown you severa; options which Shadowbox present for different objects. Here the list of parameters:
Using the method of Shadowbox.buildObjecteach of the markup, each of the markup options is obtained from the link. However, being more experienced, you may skip the objects or their arrays which include these parameters to Shadowbox.open, like here:
Shadowbox.setup can be useful if you want to set up Shadowbox link properties manually. For example, if you use Ajax to create and delete links dynamically.
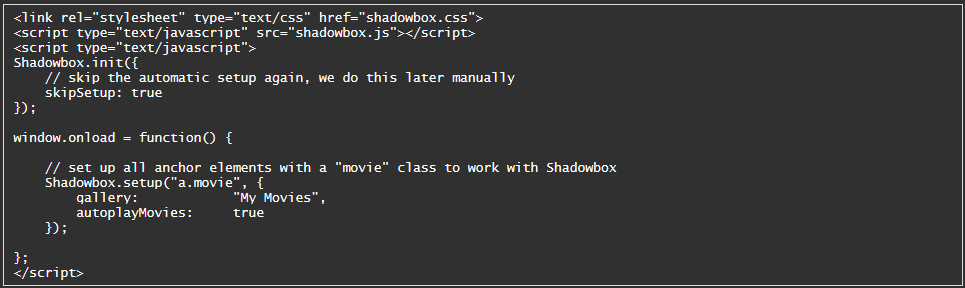
The method above makes possible to blend the parameters of link and properties. But, these properties are applied to all links in one call. It’s possible to make different Shadowbox.setup calls.
Remember:that the initial Shadowbox.setup parameter applies as a separate link element, a range of options, selector of CSS (in case you’ve added CSS support while installing the code), and a range that mix selector and the element.